How to use Motivd: get started, build your app, and manage your account.
Getting started
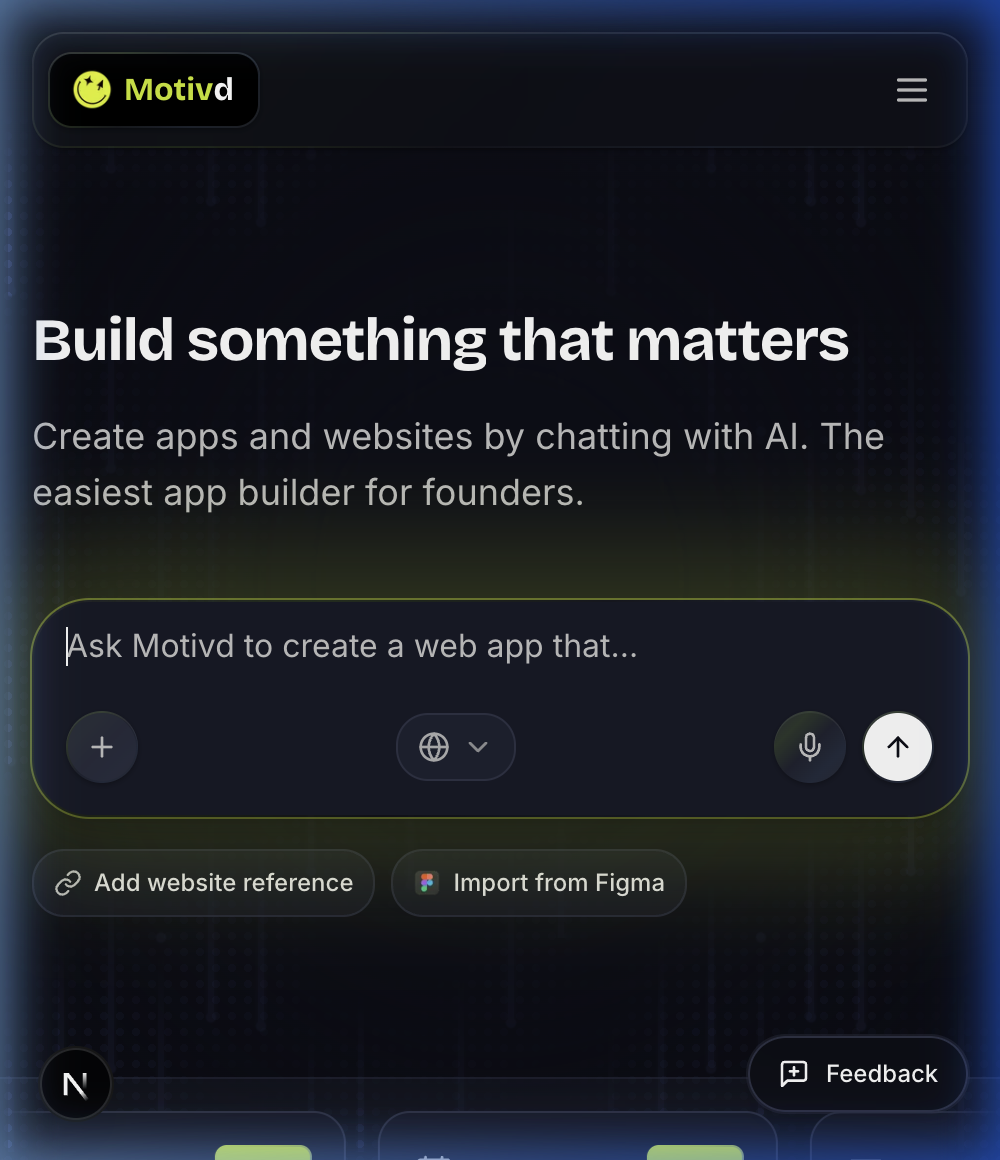
helps you create applications and websites by describing what you want in plain language. You can type your idea, attach screenshots or documents, or use voice input (on the landing hero, hold the backtick key above Tab for about one second to start recording, then release to transcribe). When you submit from home, signed-in founders now go straight into project creation and workspace handoff without repeating the same intent on a second screen. Returning founders still land in the builder shell by default.
Motivd
Sign in
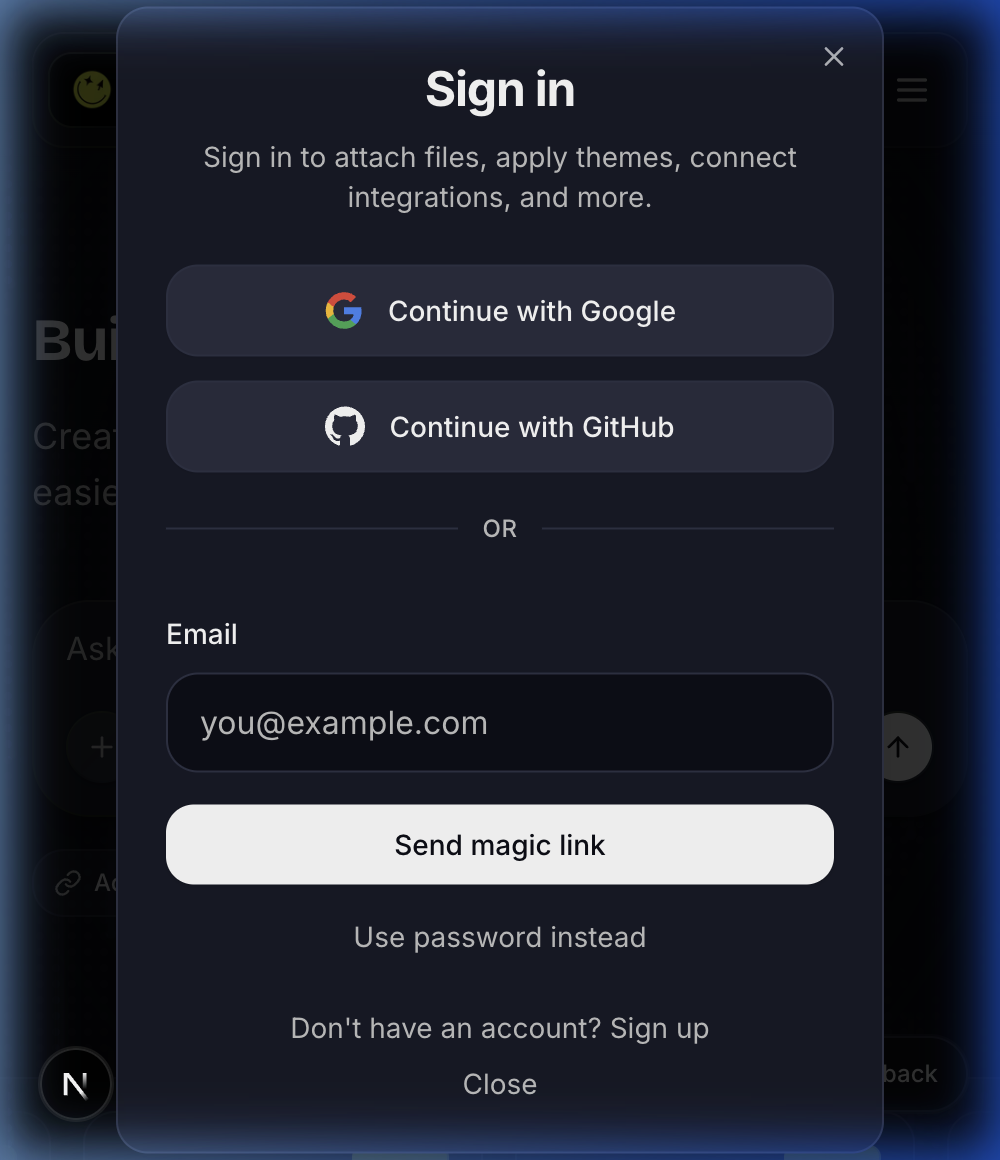
From the header, click Sign in and choose:
Continue with Google or Continue with GitHub — sign in with one click.
Continue with email — enter your email and use the magic link we send you.
Use password — sign in with your email and password. If you forgot your password, use Forgot password? to receive a secure reset link by email.
Once signed in, Motivd opens the builder shell by default. If you already have a project, it resumes the latest workspace; otherwise you land on the builder intake surface. You can still start from the home prompt or go directly to the Builder when you want a fresh project.
Your first build
From the home page, describe what you want to build in the “Ask Motivd to create” input (e.g. “A waitlist landing page for my product launch”).
Click Ask Motivd to create (or submit with Enter). If you’re signed in, Motivd carries that same prompt into project creation and opens the workspace automatically.
Use the platform selector icons (Web, iOS, Android, macOS, Windows) in the prompt bar to choose where your app should run.
In the builder you’ll complete a short onboarding (idea, audience, key features, platforms, integrations, repo preference, and optional deployment notes). Only the core idea is required: after you’ve written enough detail, Motivd can suggest values for the other fields (one AI call per idea, cached in your browser session for the same text). You’ll see a short AI indicator on each field while suggestions are applied; you can edit anything before continuing. When you create the project, Motivd starts generating the Product Requirements Document (PRD) in the background and opens the workspace right away.
Repo or Motivd Cloud — You can connect a GitHub repo (we can create one for you or connect an existing repo) or use Motivd Cloud and build with no repo. With Motivd Cloud, your code is stored securely in Motivd until you connect a repo and push live. You don’t need GitHub or your own Supabase to start; Motivd Cloud is the default backend.
Use the workspace to chat with the assistant, review the app, and deploy.
Fullstack builder at a glance
Motivd now shows the same journey map across the builder so you always know where you are and what comes next:
Onboarding — Use the same hero-style prompt surface as home (What's on your mind...?) with Add website reference and Import from Figma so most context is captured in one place.
PRD alignment — Generated in the background during the first handoff so code can start without a separate waiting screen. You can still review the PRD later.
Repo connection — Connect an existing GitHub repo, create a new one, or skip and use Motivd Cloud (build with no repo; code stored in Motivd until you connect later).
Workspace and deploy — Chat with agents, preview updates, and ship. Your backend is Motivd Cloud by default (no Supabase required); you can optionally connect your own Supabase project for full control.
Each stage still gives you orientation, but the flow now stays continuous: start cloud-first, let PRD alignment happen in the background, connect GitHub when ready, then iterate and deploy from workspace.
End-to-end founder flow
The full path from idea to a live app is: sign in → workspace (chat, live preview, optional GitHub) → Make live when you want a public URL. Motivd generates and stores your product blueprint (PRD) in the background during the first “Manifesting” moment—you stay in one continuous surface instead of stopping on a separate PRD page. You can still review the blueprint later from project memory. Repo connection stays optional (Motivd Cloud first).
Who does what (Motivd, GitHub, Vercel, Supabase)
Motivd is built so ownership stays clear from day one:
Motivd — Handles onboarding, PRD alignment, workspace AI edits, and cloud-first preview so you can build quickly in plain language.
GitHub — Stores your code history and collaboration workflow. Connect a repo when you are ready (or start in Motivd Cloud and connect later).
Vercel — Hosts your deployed preview/production site when you deploy from the connected repo.
Supabase — Powers auth/data/storage for Motivd and can also power your app backend when you choose to connect your own Supabase project.
The practical split is simple: Motivd helps you build, GitHub keeps ownership of code, Vercel serves your app live, and Supabase backs your data layer.
Builder and workspace
The builder is where your project lives: onboarding, PRD, repo setup, and the workspace.
When you start from Solutions (/[locale]/solutions/use-case/...), Motivd pre-selects a sensible integration stack (for example Supabase, Vercel, and GitHub on every template; some templates add Stripe or Resend). You can change the stack in the hero before submitting, and the same choices carry into builder onboarding and your brief summary.
?connectors= on the builder URL — If you land on /{locale}/builder with a connectors query parameter, Motivd reads a list of connector ids (the same slugs you see on /connectors and /connectors/[slug]). In the URL, separate ids with + only—not commas—(for example ?connectors=supabase+vercel+github). Motivd generates links in this form when you start from Solutions / use-case templates or other entry points that pass a preselected stack. On onboarding, an integration stack row appears so you can review or adjust those connectors; when you continue, the same ids are forwarded to the PRD step (again as connectors in the query string) so your product brief and downstream context stay aligned with the stack you chose.
Open Launch (English) / Publication (French) from the builder at /{locale}/builder/{projectId}/launch. From the workspace, use Publish → Launch / Publication; from My apps, use the project card menu next to Analytics. The page is labeled Beta in the UI.
What you can do today
App icon for store listings — Paste an HTTPS URL to a square image (for example a 1024×1024 PNG), then Save, or use Upload from device (PNG/JPEG/WebP). Uploaded icons are stored in your project’s private launch storage and the project field is updated; for final store listings, prefer a stable public HTTPS URL (CDN or your own host) if a store requires non-expiring asset links.
Native shell (Capacitor) — Pick Web content: either a static export folder (default folder name out for typical Next static export) or a production HTTPS URL for the WebView. Save native settings persists strategy, webDir, and server.url inputs on the project. Sync to project files writes capacitor.config.ts into Motivd Cloud (and patches Android/iOS project files there only if those paths already exist). Sync and push to GitHub does the same and pushes only the touched paths, but only when a GitHub repo is connected (and GitHub is linked under Settings → Integrations). A link to /docs/deployment#capacitor-native-shell explains more. If both iOS bundle id and Android package name exist on your saved configs and they differ, the UI warns you to align them before relying on Capacitor (those identifiers are not edited in the metadata side panel yet; see docs/LAUNCH_TAB.md for the full field model).
Per-platform cards — iOS (App Store), Android (Play Store), Windows (Microsoft Store), and macOS & web (PWA). Each card shows Draft and, after you save, when that platform’s draft was last updated.
Metadata (per platform) — Metadata opens a side panel where you edit shared listing fields stored separately for each platform: app name, short description, full description, version string, support URL, marketing URL, and privacy policy URL. Only fields you change are sent when you save. Values can be prefilled from your brief/PRD when a platform row is still empty.
Screenshots / Captures d’écran and Compliance / Conformité — On each platform card, these open side sheets. Screenshots lets you upload PNG/JPEG/WebP files (private launch storage), preview them, and remove uploads. Compliance loads the checklist for that platform and lets you mark items (saved per project). Store submission from Motivd is not connected from this screen yet.
Engineering detail and roadmap: docs/LAUNCH_TAB.md. Founder CI and local Capacitor workflows: docs/CAPACITOR_USER_PROJECT.md.
Onboarding and PRD
Onboarding uses one screen for the full founder intake: hero-style prompt (same style as app home), platforms, connectors, repo preference, deployment notes, and the rest of the brief—plus Add website reference and Import from Figma where applicable. The brief is stored immediately, and PRD generation starts in the background so the workspace can open without a separate waiting step. When the prompt comes from the home hero, signed-in founders now skip the extra create click and go straight to workspace entry.
When you are signed in, Create creates your Motivd Cloud project and saves the brief (including connector ids and template variables) in builder_briefs so each project keeps its own first-intake snapshot for PRD and workspace context.
Add website reference analyzes the page in the background and shows detected tech stack (for example Next.js, WordPress, or Shopify) in the preview card. That list is saved on your project as context for the PRD and workspace agents—it describes the reference site, not a requirement for what you must build.
Only the idea is hard-required before Create. Audience, MVP features, and app name can be filled in on the same screen or inferred via AI where possible.
The PRD step turns that into a short product spec: your brief is turned into a structured markdown document. When an AI provider (e.g. Groq) is configured, the draft is beautified into polished, user-ready copy with no placeholder text; otherwise you see a clear, complete template filled from your brief. You can still open the PRD page later to review or adjust it, but it no longer blocks the first workspace handoff.
Above PRD.md, Motivd shows a visual blueprint (pitch-style cards): overview, goals, audience, MVP chips, the idea-to-deploy flow, your Motivd stack (Next.js, Vercel, Supabase, GitHub), integration logos for services named in your brief or PRD (plus any stack you picked via ?connectors= on the builder URL), and target platforms. The full markdown underneath is unchanged so humans and agents read the same source.
The PRD page now includes an Align before we build checklist so you can quickly validate scope before coding starts.
Each project now has an explicit PRD approval status (Reviewed / Needs review). Once you mark a PRD as reviewed, that confirmation is remembered for the same project when you return later.
Repo setup and start-development actions unlock after PRD approval, so you keep a clear align-before-build checkpoint.
The PRD step includes autostart in the builder shell (on by default; you can turn it off). Start development runs build preflight once, keeps the founder in the same builder shell with autostart=1, and auto-sends a single kickoff message from your approved PRD without duplicating the build request.
If PRD generation fails temporarily, use Retry on the PRD page without restarting the flow.
This keeps the build focused and reduces back-and-forth.
Repo and deploy
GitHub is optional — Your source of truth in Motivd is Motivd Cloud until you connect a repo. Use GitHub when you want backup, collaborators on git, CI, or deploy-anywhere.
Create a repo — Motivd can create a repository under your user account or under a GitHub organization (requires the right org permissions and token scopes).
Connect a repo — Link an existing GitHub repo (owner/repo, full HTTPS URL, or SSH URL) so we push the generated app there.
If a repo is reachable but write permissions are missing, Motivd now shows a clear permission error before opening the workspace so you can fix access first.
If a repo connection attempt fails (for example, repo not found or access denied), Motivd shows a structured error recovery panel with the error detail and an inline "Or skip this step" link pointing directly to the Skip for now section below — so you always have both a retry path (edit the input and try again) and a secondary path (open workspace without a repo and connect GitHub later).
The PRD primary action is now Continue to repo setup so the next step is explicit before entering workspace.
If your GitHub permissions change, open Settings → Integrations and use Reconnect GitHub to refresh your OAuth token before retrying repo actions.
Connect GitHub from the PRD or Repo step uses the same Supabase GitHub OAuth flow as Settings → Integrations (not a separate GitHub OAuth app callback on the Motivd domain). After authorizing, your token is stored for repo connect and create actions.
After you connect or create a repo, the success panel now shows a visible handoff checklist: Before you continue (Avant de continuer) with two founder-facing readiness lines for AI workspace and Live preview. Each line also includes a short detail so you know whether it is already ready now or will complete when workspace opens.
The main CTA remains Continue to workspace (Continuer dans le workspace) and now includes a short hint that it opens your workspace with the linked repo, chat, and preview context together.
In Settings → Integrations, you can also manage your own model providers (OpenAI, Anthropic, Groq, OpenRouter, Moonshot (Kimi), Baseten, or custom OpenAI-compatible endpoint, plus other catalog providers) by setting a base URL, storing/rotating an API key, toggling provider active status, and following the built-in provider setup guide. Each provider is shown as a collapsed card; click a card to expand it and edit settings. Use the search box to filter providers by name. The same providers are listed on the public Connectors page (/connectors), which adds category filters, search across names, descriptions, schema text, optional alias keywords, and categories, and links to every catalog connector (including hosting, email, auth, databases, and more—not only model providers).
Some connectors (e.g. Supabase and Spotify) use a Connect flow instead of Install: on the connector’s detail page (/connectors/[slug]) you’ll see Connect to add your project URL or complete OAuth. Once connected, connector metadata appears in Settings → Integrations under Connector connections, with a link back to the connector page. Supabase also has a Manage permissions section for tables/RLS. Spotify connection supports Spotify OAuth plus app-building context for public artist/catalog lookup, playlists, and embeds; Spotify for Artists account claiming or profile administration still happens inside Spotify because Spotify does not expose that as a normal Web API control surface.
MCP and custom connectors: In a project, open Settings → Code & deploy or Settings → Integrations. Under Use Motivd as an MCP, create a named project token and copy it once into Claude, Codex, or another MCP client with the displayed /api/mcp URL. The token is read-only, limited to that project, revocable, and stored only as a hash. Under Custom MCP connectors, add either a public HTTPS Streamable HTTP server or a local MCP CLI. Hosted connectors are tested immediately and their discovered tools can be enabled individually. CLI connectors run only on your computer through the authenticated bridge; connect a local folder before testing or using them. Motivd encrypts remote headers and local environment variables and never runs founder-supplied CLI commands in the shared web server.
Stripe Connect (same integrations page) uses Stripe’s embedded onboarding and account management components so you can complete KYC and manage your connected account without leaving Motivd; an optional link still opens Stripe-hosted onboarding if you prefer it.
In the same page, you can add outbound webhooks (destination URL + subscribed events + signing secret), then update, pause, or delete them as your workflow evolves.
Webhooks now include lifecycle events for build/deploy (build.started, build.completed, build.failed, , ) and workspace approvals (, , ), plus (status, response code/body, latency, timestamps), a action, and for failed attempts so you can validate and recover deliveries without leaving Motivd.
For each webhook endpoint, you can optionally set a rate limit per minute and a failure backoff window (seconds) to control outbound traffic and reduce repeated failed delivery bursts.
If project-save is temporarily unavailable, Motivd still lets you continue to PRD and shows a clear warning so you can reconnect on the repo step.
After the app is built, you can deploy (e.g. to Vercel) and connect your domain. By default, deployment and hosting are outside Motivd; we give you the code and the repo.
Optional — Motivd-managed hosting (when enabled on a Motivd deployment): from Publish in the workspace, Enable Motivd hosting provisions a Vercel project under Motivd’s infrastructure and links it to your connected GitHub repo, so you do not need your own Vercel account for that path. Custom domains still use Motivd’s domain wizard; the live site remains tied to your GitHub repository.
Workspace
The workspace is your project’s chat and preview: talk to the assistant to change the app, fix issues, or add features. It’s built for agentic behaviour: create and use agents on demand, see how long the agent thought before answering, and act on each response with Details, Preview, and feedback. On phones, the workspace opens on Preview first so the running app stays front and center, with Chat one tap away.
The workspace header shows the project or app name, a prominent Preview pill, the current preview route (e.g. / or /admin/login), and the Backend indicator (Motivd Cloud or Supabase) with a link to the matching backend page. The project card now reports whether the browser is using Workspace preview, Local preview, or a live deploy/share state. On the right you’ll see Share (project settings), GitHub, Publish, New agent, and Change repo (or Connect if no repo is linked).
In workspace preview mode, runtime states now include explicit guidance:
when runtime is ready and no live URL exists yet, the Next step panel prioritizes Start deployment first, then keeps Open launch and Open domains visible for post-deploy follow-through;
when runtime is ready and a live URL exists, the same panel focuses on launch/domain preparation with direct links to Open launch and Open domains;
when runtime fails, a dedicated Next step panel keeps one primary recovery path (Restart preview) and one secondary assistance path (Fix with AI) visible in the preview panel.
When a is set, you may see a green strip under the header with (or if no repo is currently linked), , , and . opens your Launch workspace () for store metadata/screenshots setup, and opens your project’s page in Motivd ().
Share includes Add people: enter an email to send a Motivd invitation (teaser email with a secure link). The recipient signs in with that email, accepts on the invite page, and gets shared access to the project workspace. Pushing to the owner’s connected GitHub repo stays owner-only. Optional: set INVITE_EMAIL_HERO_IMAGE_URL or NEXT_PUBLIC_INVITE_EMAIL_HERO_IMAGE_URL for a hero image in the invitation email.
A Security strip under the header shows whether there are security issues and a Review link to the Security page, so you can keep security visible without leaving the workspace.
The chat column may show a Suggested next step card (Stripe / Motivd Cloud payments setup) at the top of the chat panel, above the messages; you can dismiss it and your choice is remembered per project.
The workspace strip now includes and capsules before the agent tabs. opens the full screen first: an Obsidian-style graph where the hub links to your PRD, collected memory, the five , and —; pan and zoom. to the same style of on the map (description, scrollable detail, estimated context; tools show the LLM ; skills show body up to a cap). on a skill toolbox (or on the chip) opens the dialog; from there skills use the markdown editor and skills are read-only in the UI. The and panels open (import, add note, markdown PRD). Use / on the map to jump to the note field or PRD editor. and also surface the full panels. The same PRD and memory content lives here as before: notes you add, agent saves, , or . / collapses the panels. opens the project task and automation center so you can review suggested work, manage checkpoints, and track AI execution without leaving the workspace.
: Use the input to give instructions in plain language. Each assistant reply is shown as an with a short title, full details (expand/collapse), and buttons to jump to the preview panel, and feedback controls (undo, thumbs up/down, more). When the agent took time to respond, you’ll see above the card so you have transparent, Cursor-style feedback. In the menu, shows Motivd credits for that reply (derived from model usage, with configurable margin); (⌘/Ctrl+P) charges a flat per assistant message for planning-style turns. Your are stored and used to improve the assistant over time (e.g. analytics, better prompts, or future model tuning). While the agent is working on your codebase in the workspace, a streams progress: if the model outputs a numbered plan (especially in plan mode), it appears as a checklist that updates as each tool step completes; otherwise you’ll see rows for each tool action (read file, update file, run command) updating in real time.
Browser notifications: When you allow notifications for this site, Motivd can show a system notification when the agent needs your answer (clarification) or hits an error, including on desktop while the workspace tab is open (so you notice even if the preview or another panel has focus). When you switch away from the tab or app, you can also get a notification when a normal reply finishes (and Web Push can apply if configured). Success replies do not notify while you are already on the chat tab, to avoid duplicate alerts.
How the agent thinks: The workspace assistant is instructed to wait for commands and tool results before building on them, to sequence dependent work and only parallelize when branches are independent, and to treat your PRD, answers, reference sites, Figma/design links, paths, , and (provided safely via the question flow) as primary inputs alongside the repo—so planning stays aligned with what you actually specified.
UI and layout work — You do not need a special command: requests that look like design, layout, or styling (and optional Visual edits selection) may run through Motivd’s 21st.dev–backed generation path on the server. If that path is not configured, you’ll see a clear error instead of a silent downgrade. API and database work still use the normal workspace agent flow.
: Workspace chat now uses one consistent failure pattern: each error card shows one plus one . errors ("AI usage limit reached") show ; errors ("Session expired") show ; errors ("Something went wrong") show . Provider authentication failures are normalized before display, so invalid OpenRouter/Groq/OpenAI-compatible key responses point users to switch models, update , or contact support for Motivd-managed models instead of showing raw provider JSON. Every error card also includes (to ) as the secondary path so founders never hit a dead end. The chat input re-enables automatically after errors so you can continue without manual reset.
Each agent tab shows a circular ring around the agent icon: it estimates how much of the model context window that thread uses (per-tab messages differ; the active tab also includes queued sends and preview selection). Hover a tab for the tooltip (model, window size, % used). The Memory chip uses the same ring pattern around the brain icon for project memory in agent context (PRD excerpt + up to 25 newest memory lines, same caps as the workspace system prompt). Numbers are approximate; refetch runs when you close the Memory dialog.
Use Visual edits next to the input to focus the preview panel (e.g. to inspect changes). You can run multiple agents in parallel via tabs and create new ones with New agent.
: If your project already has a PRD and no tasks yet, the Tasks popup starts with a suggested plan derived from that PRD. Review it, edit or remove items, and confirm when you want those tasks persisted. To add task by hand, use to open the short form, then (you will not see empty title fields until you choose that path). The dialog groups work by status (, , , , , , , ) and keeps dependencies, activity, and latest agent runs tied to each task.
Human checkpoints: Tasks can block on approvals, secrets, clarifications, or other required human input. On phone, the popup switches to dedicated Tasks, Needs you, and Activity tabs so those checkpoints stay usable on small screens.
Apps page and project card menu
From My apps (/apps) you see all your builder projects in a grid or list. Each project card shows the project name, last edited date, and a three-dots menu (bottom left of the card). Use it to: Open in new tab (builder in a new tab), View published site (preview or sandbox URL when set), Analytics, Move to folder (pick an existing folder, create a new one, or move back to No folder (root)—saved on the project), Remix (start a new project from this one), Rename (edit name in a dialog; slug updates accordingly), Settings (project settings: name, sandbox URL), Publish to profile (publish-settings page), and Delete (with confirmation; removes the project and all related data). You can also select multiple cards with the checkbox and use the bottom action bar to Move to folder (same folder for all selected) or Delete selected projects. Rename, folder moves, and delete are saved immediately; the list updates in place.
If you open /{locale}/builder/{projectId} and that project was deleted or your account cannot access it (for example you are signed in as a different user), Motivd sends you to My apps with a short Project unavailable notice instead of dropping you on the generic builder onboarding.
Project editor and settings
The project editor is the combination of project settings and the project card in the builder. When you're in the builder on a project (workspace or project settings), the top bar shows a project card with the project name and current preview state (for example, Workspace preview ready, Syncing workspace preview, Local preview connected, or Workspace preview needs attention). Click it to open a menu with: Go to Workspace, your workspace name and plan, Credits (and link to Plans), Get free credits, Settings, Remix this project, Publish to profile, Rename project, Star/Unstar project, Move to folder, Details, Appearance, and Help. Use this to switch projects, check credits, or jump to settings without leaving the builder. Project settings (open via Settings in the workspace or project card, or from the Apps page three-dots menu) let you edit the project name, sandbox URL slug (the unique part of your public sandbox link, e.g. motivd.com/s/your-slug), and appearance. In Settings → Overview, Download ZIP exports your Motivd Cloud files (and PRD.md when stored on the project) without requiring GitHub. Published preview URLs are still stored on the project and used for sharing, publishing, and live-site verification. On smaller viewports, open the menu icon in the settings header to pick a section (slide-out panel); on large screens the section list stays in a left sidebar.
Automation (Settings → Automation / Automatisations) lets you schedule the workspace agent on a daily, weekly, or monthly cadence in UTC, tied to a specific agent tab (session). Each run uses the same AI usage limits as a manual SDK run; production uses an hourly cron job to pick up due schedules. The same screen shows Recent runs (history + where the job ran). On Motivd Cloud deployments that enable a remote runner, the cron may only enqueue work while a dedicated worker executes the agent; workers use a heartbeat lease so a crashed runner does not block the schedule forever (see docs/AGENT_SANDBOX_PHASE1.md through docs/AGENT_SANDBOX_PHASE3.md for operators).
Motivd Autopilot is an optional automation preset on the same Automation page (project owners only). When enabled, each run follows a fixed playbook: assess Motivd Cloud files, propose three tasks, execute them sequentially with SDK sub-agents, then—if a GitHub repo is connected and the owner has GitHub linked— changes (default branch by default, or a branch if you choose that in Autopilot options). After a successful Autopilot run, Motivd emails a short report to the and , unless you turn on . Autopilot is opt-in; pushing to the default branch can change production code—use PR mode when you want human review first. Run summaries are stored on the schedule run row for support and debugging ( in the database).
Your workspace conversations now persist per project: when you return to the same project, your previous agent tabs and messages are restored automatically.
Agent tabs start as Agent 1, Agent 2, and so on; after the first completed reply in a thread, the tab title updates to a short descriptive label (from your first real message and the assistant’s answer) so parallel workstreams are easier to scan at a glance.
The preview route dropdown (e.g. /, /about) is inferred from Next.js page files in your saved Motivd Cloud files (builder_project_files) first, so it matches what the workspace preview and agent actually run. If no routes can be inferred there yet (empty project or no pages), it falls back to your connected GitHub default branch when OAuth is available. Dynamic segments such as or appear as-is so you know they need a concrete URL in the browser.
The preview panel boots the latest saved project snapshot from builder_project_files inside a browser-native WebContainer, so the main browser is no longer blocked on GitHub deploys or a separate preview server. This workspace runtime is the default browser source even when a repo is connected. Connecting an existing GitHub repository imports its supported text source files into Motivd Cloud so Code, chat agents, and Preview operate on the same snapshot.
When you already have a saved live / preview URL (HTTPS, not localhost) but the main iframe is still on workspace preview, the panel can show a short “Your deploy is live” strip with Open live site so it is obvious that the iframe is the fast workspace runtime and the public URL is separate. You can dismiss the hint per session; it reappears after a new deploy completes.
Every project has an auto-generated, editable sandbox URL. In production, when subdomain sandbox is enabled (e.g. NEXT_PUBLIC_SANDBOX_DOMAIN=motivd.com), the URL is https://your-slug.motivd.com (e.g. https://todo-spark.motivd.com). Otherwise it uses the path form . The slug is unique across all apps and can be changed in . The sandbox URL still appears in the publish toolbox as a share hint, but the main iframe uses until a is saved on the project (publish or discover)—so the panel does not poll an empty sandbox before the first deploy.
Publish trust signal: the status Build successful — live / Build réussi — en ligne appears only after Motivd verifies that the discovered live URL is actually reachable (not just returned by discovery). This keeps deploy messaging aligned with what founders can open.
When Publish → Update verifies a stale or unreachable discovered live URL, the status changes to Live URL not confirmed / URL en direct non confirmée and the Publish toolbox stays open with localized recovery guidance so you can retry immediately without losing the next-step context.
Agent write_file changes and Code-panel saves update the running browser runtime automatically; normal Next.js/Vite hot reload makes the edited result visible without clicking Refresh preview. Dependency-file changes restart the runtime so newly added packages are installed. If the browser runtime is unavailable, Motivd can fall back to the configured preview sidecar or a safe deployed URL.
If the workspace runtime hits a problem, the preview panel shows explicit states such as , , , , or , plus recent logs and a action. When preview is (template does not match workspace preview v1 — with a supported or entry and a standard Next config such as / / / without custom or , or with a root ), use to send a structured fix request to the active chat agent, then after the agent updates files.
If the preview API fails (auth, network, or server), the panel shows Workspace preview unavailable with the error text and Retry preview instead of spinning forever on “Preparing.” Chat uses a daily-credit check backed by Supabase RPC try_consume_builder_daily_credit; the app attempts to create a missing profiles row before consuming a credit. If you self-host and see credit or RPC errors, apply migrations through 20260325223000_agent_message_usage_daily_credits_enforcement.sql (or newer) on your Supabase project.
Use in chat when you want an explicit local override. Local preview still takes precedence over the workspace runtime, and published preview URLs still power share links and live-site checks. If you ask the assistant to or start dev server, connect first so Motivd can run the command on your machine; the cloud agent otherwise edits the project in Motivd’s workspace and cannot reach your laptop’s . When the folder you choose is a normal Git clone whose remote points at , Motivd reads in the browser and can that repository automatically (same server check as ), as long as GitHub is connected in . Unusual layouts (for example some worktrees or submodules) may not auto-detect.
Motivd Browser (Chrome extension, see docs/MOTIVD_BROWSER_EXTENSION.md): Install the extension, open your preview tab (e.g. localhost or *.vercel.app), use the extension popup Attach this tab, then return to the builder. When the status under the chat shows a tab as attached, the agent can use browser tools to snapshot the page, click, type, and capture screenshots in that real tab. This is separate from Local folder (files and dev server) but pairs well for end-to-end checks.
If the in-workspace terminal shows spawn npm ENOENT, Node/npm wasn’t on the shell PATH for that run (common on Mac when Homebrew lives under /opt/homebrew/bin, or when the bridge was started from a minimal environment). Install Node.js, ensure which npm works in Terminal, restart the Motivd bridge from that same terminal, or use the cloud terminal after pulling the latest app (PATH now inherits your dev machine’s environment).
When the terminal shows a likely build or Next.js error (non-zero exit, TypeScript/webpack messages, npm ERR!, etc.), use Fix with AI in the terminal header to send the recent transcript to the workspace agent. It opens chat on mobile, injects a structured “diagnose and fix” prompt with the log excerpt, and the agent can edit files and suggest a command to re-run (e.g. npm run build).
Once a preview URL is available, workspace shows a dismissible ownership note with quick links to your repo, your live preview, and custom-domain setup docs so “your repo, your app, your domain” stays explicit.
Version history (workspace History; mobile uses a History tab): See Motivd Cloud checkpoints and commits from your linked GitHub repo on one timeline. versions you care about: use the bookmark control on a row (or in the detail header when a commit is selected), or bookmark snapshots the same way—Cloud bookmarks are stored on the snapshot; GitHub bookmarks are per user on the project so teammates can keep their own markers. For a checkpoint, restores your workspace files from that snapshot (Motivd saves a snapshot first so you can undo). Revert updates file state used by the workspace preview; it does not rewrite Git history on GitHub.
Click GitHub in the header to open a toolbar: when no repo is connected, use Connect GitHub to open the GitHub — connect your repo dialog directly inside the workspace (the same repo-connect flow as the Repo step, without navigating away). When a repo is connected, the toolbar shows the repo name, Edit in VS Code, Configure (project settings), and a help link to this guide.
In-workspace repo connect (re-entry path): If you skipped the Repo step and entered the workspace without a GitHub repo, you can connect one at any time without leaving the workspace. Click GitHub in the workspace toolbar (desktop/tablet) or use the + menu item Connect or create GitHub repo (all devices) to open the GitHub — connect your repo dialog. Connect an existing repo or create a new one; when connected, the success panel shows a Continue to workspace button that dismisses the dialog and keeps you in the current workspace session (no page navigation). After connecting, the toolbar updates to show your linked repo name.
On the Repo step, connecting an existing GitHub repo now syncs the Motivd project name to that repo’s name automatically. If you create a new repo from Motivd, the project keeps the name you chose for the new repo/project. The page is written for founders first; hover the small ? icons next to headings and notices for developer-oriented details (OAuth scopes, URL formats, GitHub owner field, token setup).
From the workspace chat, the + menu includes Connect or create GitHub repo when the project has no linked repo yet — same flow as the Repo step, without leaving the workspace. After GitHub is linked, the dedicated Repo URL sends you straight to the workspace, and the PRD primary button becomes Continue to workspace when a repo is already on the project.
Use the preview to see the running app and share feedback in chat. The in-editor browser is now for the latest saved workspace state; Share and publish actions still point at the stored live preview URL when one exists.
The assistant uses your project context (brief + PRD + repo + backend + preview URL, plus a best-effort top-level repo snapshot) to keep suggestions aligned with your live project setup.
Build logs
From the PRD step, clicking Start development now opens live pipeline logs.
Logs stream through key stages: preflight, commit, build, and deploy.
If a preview URL is discovered during deployment, it appears in the logs and can be used in the workspace preview panel.
Testing on a real iPhone (advanced)
When your app has a live HTTPS preview URL (for example from Vercel), you can test on a physical iPhone in two ways:
Scan the QR code in the workspace Preview toolbar (Open on phone) to open the same URL in mobile Safari on your device.
For full-screen mirroring and control from a desktop browser, use community tooling such as iOS-remote (GPL-3.0). That workflow runs on your computer: USB to the device, WebDriverAgent, and a small local web UI. Motivd does not host iPhones; this is optional for founders who need deeper QA than the in-app mobile viewport.
License: iOS-remote is GPL-3.0. If you integrate or redistribute it, comply with the license; many teams run it as a separate local install only.
See also: docs/CAPACITOR_USER_PROJECT.md (remote URL mode for Capacitor WebView content).
Tester sur un iPhone réel (avancé)
Lorsque votre application dispose d’une URL d’aperçu HTTPS en direct (par exemple Vercel), vous pouvez tester sur un iPhone physique de deux façons :
Scannez le code QR dans la barre d’outils Aperçu du workspace (Ouvrir sur le téléphone) pour ouvrir la même URL dans Safari mobile.
Pour un miroir plein écran et le contrôle depuis le navigateur sur bureau, des outils communautaires comme iOS-remote (GPL-3.0) existent. Ce flux s’exécute sur votre ordinateur : USB vers l’appareil, WebDriverAgent, et une petite interface web locale. Motivd n’héberge pas d’iPhone ; c’est optionnel pour les fondateurs qui ont besoin d’un QA plus poussé que le viewport mobile intégré.
Licence : iOS-remote est sous GPL-3.0. En cas d’intégration ou de redistribution, respectez la licence ; beaucoup d’équipes ne font qu’une installation locale séparée.
Voir aussi : docs/CAPACITOR_USER_PROJECT.md (mode URL distante pour le contenu WebView Capacitor).
GitHub two-way sync and code collaboration
Motivd is built around your repo as the single source of truth. We push code to GitHub; you and your team edit in your preferred tools (VS Code, Cursor, or any editor); changes stay in sync. That’s different from walled-garden or one-way tools—here’s how it works and how to get the most out of it.
What is two-way sync?
Motivd → GitHub: We generate or update your app and push commits to the repository you connected (create new or connect existing). Every build or workspace-driven change goes to a branch we control so you can review and merge.
GitHub → Motivd: We read your repo (structure, key files, PRD-relevant context) so the workspace assistant can suggest changes that fit your codebase. When you or a teammate push from VS Code, Cursor, or the command line, that code is in GitHub; we don’t overwrite it unless you ask us to (e.g. by accepting a workspace suggestion that then gets committed).
You own the repo: The repository is under your (or your org’s) GitHub account. You deploy where you want (e.g. Vercel), use your own domain, and collaborate with standard Git workflows. No lock-in.
Why Motivd’s approach is different
Alignment before code: We use a PRD step so you and the system agree on scope before any code is generated. That reduces churn and keeps collaboration focused. Tools that generate first and align later often lead to more back-and-forth.
Real ownership from day one: You connect or create a GitHub repo early. Everything we build lands in that repo. Unlike flows where “export” or “sync” is an extra step, your main workflow is already Git-centric.
Workspace + GitHub together: In the workspace you chat with the assistant, get suggestions, and use Preview and Details. When you’re ready, we commit to your repo. You can then Edit in VS Code (or Cursor) and keep working locally. The same repo is the source for both Motivd’s preview and your own deployments.
Collaboration with your tools: Teammates can clone the repo, use any editor (VS Code, Cursor, etc.), and push changes. Motivd doesn’t replace your IDE or version control—it adds an AI-powered builder that writes into the same repo you use for collaboration.
No walled garden: We don’t lock your project inside a proprietary environment. You’re not tied to a single IDE or a “sync” that only works one way. What you have in GitHub is what you own and deploy.
How it works in practice
Connect or create a repo (from the Repo step after PRD approval). Use Settings → Integrations to connect GitHub if needed; then connect the repo for this project.
Initial build: We generate the app and push to your repo (e.g. to a branch we create). You can merge to main when ready.
Workspace updates: When the agent saves real edits to your project files (code, config, or the PRD), Motivd can snapshot the project and push those updates to your connected repo on main. Plain chat—answers, questions, or planning without file edits—does not trigger a push, so you should not see a “pushed to main” style update unless something in the project actually changed.
Local edits: Use Edit in VS Code from the workspace GitHub toolbar to open the repo in your editor. Edit, commit, and push as usual. Your pushes are the source of truth; we don’t overwrite them unless you trigger a new build or accept a workspace change that we then commit.
Preview: The workspace preview uses the latest saved project files by default, so you can test changes before a deploy exists. Your stored Preview URL (deployment/sandbox) is still used for sharing, publish flows, and live-site checks.
Working with your team
Single repo, many editors: Everyone works in the same GitHub repo. Use branches and pull requests for larger changes; use Motivd for fast iterations and alignment, then hand off to your team’s normal Git flow.
When to use the workspace vs local: Use the workspace for idea-to-code, quick iterations, and PRD-aligned changes. Use VS Code / Cursor for deep refactors, dependency upgrades, or when you prefer to edit files directly. Both write to the same repo.
Avoiding conflicts: If you’re about to run a big workspace action (e.g. “add a new feature”), pull the latest from GitHub first so we don’t overwrite recent local work. If we push to a branch, merge or rebase before making more local changes so history stays clear.
Comparison with other tools
Lovable / one-way or export-only tools: Many builders generate an app in their own environment; you may export or sync later. With Motivd, the repo is central from the start: we push there, you edit there, and deployment is from that repo. No separate “export” step.
Cursor / IDE-only flows: Cursor is great for editing in your repo. Motivd complements that: we handle idea → PRD → initial app and ongoing workspace-driven changes into the same repo. You can use Cursor (or VS Code) for everything else. Same repo, two ways to write code (Motivd workspace + your IDE).
Best of both: Use Motivd for alignment (PRD), bootstrap, and fast feature iterations; use your IDE and GitHub for collaboration, code review, and deployment. One repo, one source of truth.
The Help (?) button in the workspace GitHub toolbar opens this section of the User Guide so you can share it with your team or refer back when setting up sync and collaboration.
Community case studies
Open Community from the main navigation to browse real shipped case studies.
Each card is clickable and opens the full case study details page.
Card thumbnails now show the screenshot cleanly (no top overlay banner) for a clearer preview.
Use Remix on the card or on the case study details page to open the builder with a prefilled prompt based on that case study.
Plans and credits
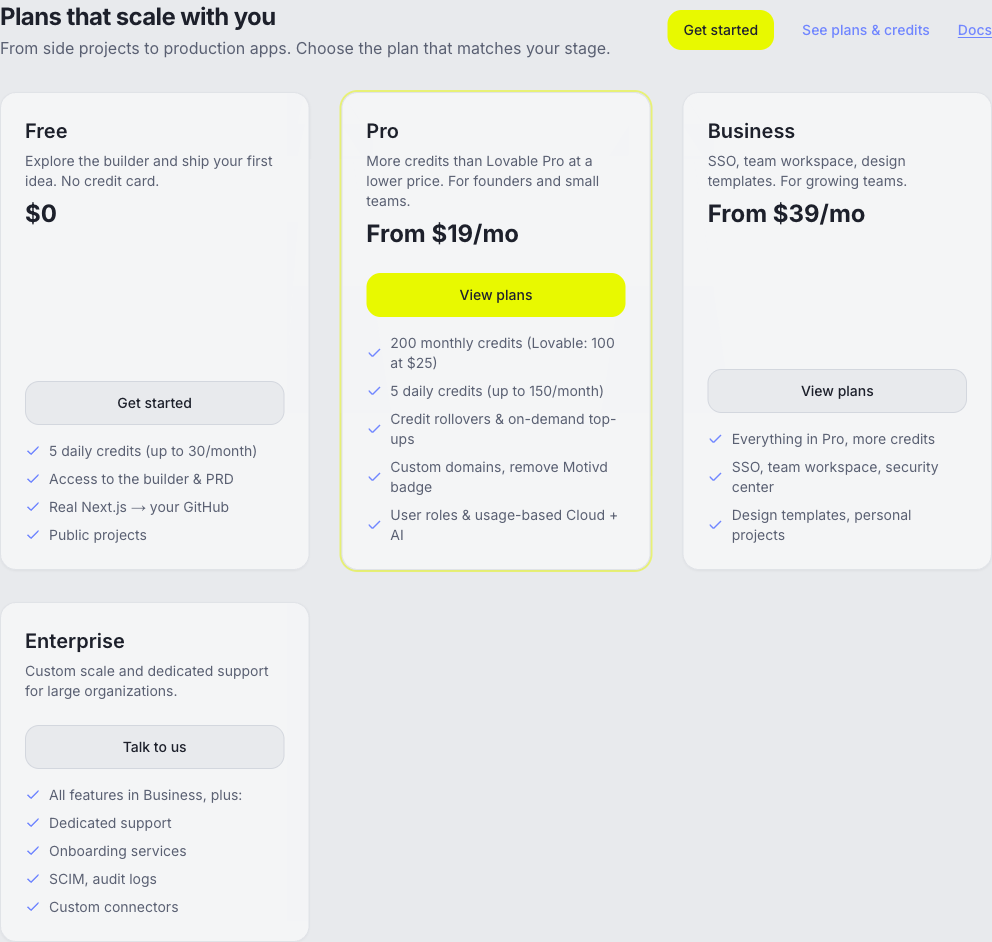
Pricing — To compare plans and see what's included before signing in, open the Pricing page (link in the header and footer). You'll find plan tiers, features, and clear upgrade CTAs so you can choose the right fit.
Plans & credits — When signed in, go to Plans in the header or footer (or from the user menu) to see your current plan, credits remaining, and options for Pro, Business, and Enterprise. Plan upgrades, credit top-ups, and gift-card purchases use Stripe checkout and are available in English and French (locale-aware return paths).
Referral program — When signed in, the sidebar Share Motivd card opens a compact modal: copy your invite link, a short “how it works,” and live signup and paid-conversion counts. The same content lives on /{locale}/referral (English and French routes). Referrers earn 100 credits when a referred user becomes a paying customer, as described on that page and in Terms.
Credits are consumed when you use the builder and AI features. Check the Plans page for exact usage and limits.
Motivd now also applies a separate AI usage guardrail for Anthropic-backed features: each actor gets a hard $1.00 spend bucket that starts on first use and lasts 5 hours. When that bucket is exhausted, covered AI routes return a clear blocked state until the window resets.
The Plans page shows the current guardrail budget, used amount, remaining amount, and reset time. In the builder workspace, the agent composer shows an inline guardrail banner and disables send when the window is exhausted.
Allowlisted Motivd admins see an Admin tab under Project settings (sidebar section Motivd team) to toggle the per-project standard AI usage window cap (5h) on or off. The tab is hidden for everyone else; Pro and Business accounts can still widen the cap via the project API where the server allows it.
Allowlisted (same allowlist as ) can open for visitor analytics and internal tools. The tab lists (when and the webhook are configured), generates from product context, and lets you replies via Resend—useful for managing aliases like and from one place. A bottom-right control starts messages (same send path as replies; replies from the contact still thread in the inbox).
For Enterprise, Book a demo now uses a real conversion path: if a booking URL is configured it opens your scheduling page directly; otherwise it opens an in-app demo request form so teams can submit their needs from the Plans page.
Legal / enterprise intake — On Plans, under Security and compliance, a dashed Request panel lets visitors submit MSAs, DPAs, questionnaires, or procurement context. Submissions email your configured internal addresses (see ENTERPRISE_LEGAL_REQUEST_EMAILS in .env.example). If NEXT_PUBLIC_CALENDLY_LEGAL_CONSULT_URL is set to a Calendly HTTPS link, a scheduling iframe appears after submit so the visitor can book time; calendar invites are sent by Calendly (not by the Google Calendar API from Motivd).
Payment and billing
Secure checkout — All payments are processed through Stripe, a secure payment platform used by millions of businesses. Your payment information is encrypted and never stored on Motivd's servers.
Subscription management — Pro and Business plans are billed monthly or annually. You can upgrade, downgrade, or cancel your subscription anytime from the Plans page.
Credit top-ups — Purchase additional credits on-demand when you need extra capacity. Top-up credits are valid for 12 months from purchase. When your project has a Stripe publishable key configured, Top up credits opens embedded Stripe Checkout inside the dialog (same pattern as gift cards); otherwise checkout may open on Stripe’s hosted page.
Billing history — Access your invoices and payment history through Stripe's customer portal, available via the "Manage" button on your Plans page.
Payment methods — Stripe supports all major credit cards, debit cards, and local payment methods depending on your region.
Gift cards and discounts
Gift cards — Open /{locale}/plans/gift-cards to buy with Stripe checkout in an on-page dialog (embedded checkout), or redeem an existing code with the form. If inline checkout is unavailable, you are redirected to Stripe’s secure hosted page instead. Gift cards can be applied as credits to any Motivd account.
Student discount — Open /{locale}/plans/student-discount to submit student verification and receive discount access by email after review. Students can receive up to 50% off Pro plans.
Redemption process — When redeeming gift cards or discount codes, enter your information in the form and our team will process your request within 1-2 business days.
Billing issues and support
Failed payments — If a payment fails, you'll receive an email notification with instructions to update your payment method. Your account remains active for a grace period. While a subscription renewal is past due or unpaid, the project workspace shows a red banner at the top with a link to Update payment method (Stripe billing portal) and a short grace-period explanation.
Refunds — Refund requests can be submitted through our support system. Pro-rated refunds are available for annual subscriptions within 30 days of purchase.
Tax compliance — Stripe automatically calculates and collects applicable taxes based on your billing address and local regulations.
Currency support — Pricing is displayed in USD, EUR, or your local currency depending on your location. Stripe handles currency conversion automatically.
Profile
Open your profile from the user menu or go to /[locale]/profile to edit your display name, bio, profile picture (avatar), and cover image.
When you change your profile picture or cover image, a crop step opens: you can drag to reposition, use the zoom slider to resize, then click Apply to save. Avatar uses a circular crop; cover uses a wide banner ratio. This gives you full control over how your profile looks.
Projects and organization
In My apps (/[locale]/apps), search projects by name, filter by status (e.g. Published, Draft) or sort by last edited or name, and switch between grid and list view. Select one or more projects with the checkboxes to show the action bar: Move to folder, Delete, Clear, or Cancel.
Use the three-dots menu on any project card to: open in a new tab, view the published site, open Analytics, Move to folder (folder picker loads your existing folders from the server; you can create a new folder or clear back to root), Remix, Rename, Settings, Publish to profile, or Delete.
Analytics (/[locale]/builder/[projectId]/analytics) — view traffic, engagement, and deployment metrics for a specific project. Shows page views, unique visitors, avg session duration, bounce rate, a traffic area chart, top pages, device breakdown, and a deployment success chart. Requires a preview URL to be set.
Move to folder — opens a dialog to pick an existing folder, create a new one, or choose No folder (root). Folder names are stored per project and listed across your apps; English and French UI match your locale.
In the workspace sidebar Recents list, you can toggle Starred only and star/unstar projects directly.
If a star update fails (for example, unstable or offline connection), Motivd shows a subtle inline retry action so you can recover without leaving the page.
Mobile workspace tabs (Preview / Chat / History) — On a phone-sized layout, switching tabs uses a light haptic on supported native shells (iOS wrapper or Capacitor). The workspace opens on Preview first by default so the running app stays front and center; Chat and History remain one tap away. When the AI agent finishes a reply and you are not on Chat (or the tab is in the background), Motivd can show a local or browser notification so you notice the result. Allow notifications when prompted; for full browser background delivery, the project must configure in the deployment environment (see project ).
Coming soon features
These features are live as preview pages (with early access sign-up). They show what's planned and let you get notified:
Teams (/[locale]/settings/teams) — Invite collaborators by email, assign Owner/Editor/Viewer roles, collaborate in real time.
Notifications (/[locale]/settings/notifications) — Per-event notification preferences across in-app, email, mobile push, and Slack.
Activity feed (/[locale]/activity) — Chronological log of all workspace events: deployments, agent tasks, team actions, settings changes, and code pushes.
Custom domains (/[locale]/builder/[projectId]/domains) — Connect a custom domain with automatic SSL. Until available, set a preview URL via your deployment provider and paste it in project settings.
Supabase connection (/[locale]/cloud/supabase) — Connect your own Supabase project (URL + anon key) as the backend for your apps instead of Motivd Cloud. The connection form is now available.
Cloud logs (/[locale]/cloud/logs) — Live log viewer filtered by level and source across API, database, edge functions, and app runtime.
Cloud backend
Cloud (/[locale]/cloud) — Manage your app's backend: database, users, storage, secrets, edge functions, AI usage, and custom emails.
Supabase — Connect your own Supabase project in Cloud → Use Supabase. Add your project URL and anon key; use Test connection to verify before saving.
Logs — Cloud → Logs shows a searchable, filterable log viewer for API calls, database events, edge functions, and deploy events. Click a row to expand details.
Cloud in the project editor — From the builder preview toolbar, open Cloud to see a live snapshot for the current project: Motivd Cloud table row counts (files, tasks, chat, memory, versions, automation), Launch bucket storage, recent automation run lines, workspace AI usage (when DATABASE_URL is configured on the server), Vercel deployment env names when your Vercel account is connected and a matching project is found, and collaborators/invites. Use Open full dashboard on each section for the marketing Cloud pages or external tools; arbitrary SQL is not executed from the builder.
FAQ and help
The FAQ (link in header and footer) answers common questions about Motivd, the builder, billing, and security.
For API and integration details, see API documentation in the docs section; for deploy and environment topics, see Deployment guide. Internal architecture notes are limited to the Motivd team (admin documentation).
Security and privacy
Security — The Security page explains our security posture in plain language (sign-in, server-side access to your projects, subprocessors transparency, no training on your content, and how to request trust materials). It is not a substitute for a Data Processing Agreement or vendor questionnaire: enterprise buyers should email security@motivd.com for current attestations and the subprocessor list. Workspace deploy labels (for example Build successful — live or Live URL not confirmed) are runtime status signals, not compliance attestations.
Privacy — The Privacy Policy is the binding statement of what we collect, why, retention, international transfers, and your rights (including GDPR-style rights where they apply).
Terms — The Terms of Service govern your use of Motivd (limitations, acceptable use, liability cap, etc.).
All of these are linked from the footer and relevant pages (e.g. Plans, sign-in).